Showing posts with label crafty. Show all posts

Tuesday, October 25, 2016

A Day spent Knitting, Reading and Blogging

Hello Friends,


I hope that you are having a good day and enjoying these final days of October. Today I was spending time knitting my second sock with Charisma Heather yarn by Loops & Threads as a Christmas gift to my mom. She liked the socks I knit her last year so I am making her another pair this time in the denim color she liked. My sister also requested a pair for Christmas so I will be busy! I love this time of the year, Halloween is soon approaching with the thoughts of my favorite holiday Christmas coming in a couple of months.


I started reading a book called Zen and the Art of Knitting by Bernadette Murphy which I am really enjoying so far. I thought I would share this book because it discusses knitting as an art form, the benefits of knitting, why people knit, and shares stories about people knitting who the author has interviewed. I am excited to read more of the book, I started reading it last night and I was reading more today. Here is my cat trying to get my yarn while I take a photo!


I have been on Instagram more often now posting photos and following other people and liking their photos. I am really happy having new followers and being able to see other people's projects which they knitted or crocheted. It truly is a wonderful community and I am proud to be a part of it. You can follow me on Instagram by clicking on the link below this post :)

click here to follow me on Instagram!


Hope you all have a great day and thank you for visiting my blog!

Please follow me!

Follow on Bloglovin

Instagram

Tuesday, October 15, 2013

Green infinity scarf done!

Hello friends,

I have completed yet another infinity scarf ! my cousin requested one like the one I had just completed only in green instead,  I quickly got to work buying three balls of "Thick and quick" Lion Brand wool and knitting it up as fast as I could.  I enjoyed the process and I also found it amazing that I could complete a scarf in a week! (that's what passion and a deadline will do for you!) so here it is, completed and I am modeling in the photo.  I can't wait until she receives it to see her reaction :)

Take care!

Lisa :)

Monday, November 12, 2012

DIY: White Yarn Christmas Wreath

Hello friends,

I’m sorry I haven’t posted for a couple days now.  I have been busy with my placement and course work.  I have a DIY for you though..... J  It is a fun and quick holiday craft.  A Christmas wreath! I found the craft on the Better Homes and Gardens website.  I fell in love with this wreath and had to try it out for myself.  I made a tutorial as well and documented making it along the way.  I hope you have as much fun making it as I did!

 You will need:
-         Stryofoam wreath or straw wreath with the plastic still on.

-          White yarn

-          Felt, three pieces in red and olive color

-          Hot glue gun and glue sticks

       -          Six faux pearls (I didn't use them in my demonstration)

-          Florist’s pick with red and green berries.


Step 1:  glue the beginning of the wool you will use to wrap your wreath so it doesn’t unravel. 


Step 2:  Begin to wrap the white yarn all the way around your wreath until it looks like this!  (watch out for overlapping, make sure none of the green is showing through)  Then glue the last of the yarn when your yarn finally meets the starting point.


Step 3: glue on the berries on the side of the wreath.


Step 4: cut out 5” by 5” squares and then cut into circles.  Then on the back of the circle draw a spiral.  Cut the spiral out.  Then fold it into flowers by rolling the spiral from the center out.


Step 5: then you end up with these! (pretty aren’t they?)


Step 6: glue the six flowers below the berries stem, there should be four bigger flowers and 2 smaller flowers.


Step 7: cut two leaves out of the olive felt.  Then glue them on also.


Step 8:  Ta-da! You have your Christmas wreath to put on your front door or in your home to be all ready to celebrate the holiday season.

 Enjoy!
 
Have a good night and enjoy your day tomorrow!


Saturday, November 3, 2012

DIY: Recycled Card Ornament

 Hi friends, 

 I found a DIY project for you to try to get into the Christmas spirit! I found it at Cathie and Steve. All the photos were taken by me as I made my own version.  Try it out! just collect some of your old Christmas cards from years past and make something new from the old :) enjoy

Get a christmas card and choose the main picture or picture you like best and draw a circle around it.  Cut it out.

 
 Once you have your cut out,  use a triange that is lengthwise your circle and then fold up the three corners.
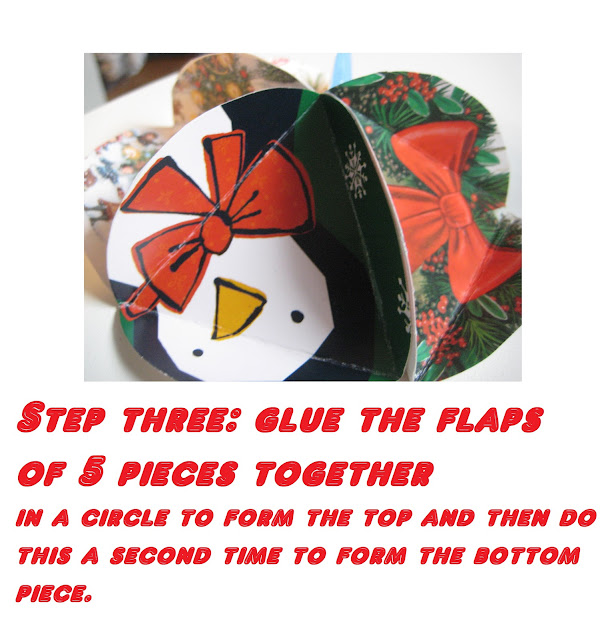
 Once you have cut out five pieces, glue the two flaps of each of the five together to form a circle of fine.  Do this twice for the top and bottom of your ornament.


 Glue the middle onto the flaps and connect the top piece.  Pull the ribbon up as you do this. 

And there you go, you have your very own recycled Christmas card ornament :) enjoy!


Lisa xo

Wednesday, January 27, 2010

box :)

Hey Everyone!

I didn't write yesterday because Bell was acting up and my internet connection was not working :(
So latest project: I found a small, plain white, necklace blox in my room. There is so much you can do with a white box! I feel the spark of opportunity and am so excited to paint it.
I was thinking of painting an owl on it because I seem to be really drawn to owls right now.
this is a picture of the kind of owls I am interested in painting on this particular box.

Photo Cred: http://printpattern.blogspot.com/

Thanks for visiting!
Lisa

Sunday, November 22, 2009

Bird Cage Decor

Hello <3
I found this ad in a magazine today from one of my old magazines, Teen Vogue April 2007 edition. The photos were labeled 'Tapeze Artists' and were photographed in Hong Kong by Raymond Meier.
The ad that Inspired me :)


On my dresser. I got the bird cage from Value Village for $ and had the bird necklaces from Claire's Icing, then cut birds out of construction paper. A fun, inexpensive way to have some new decor for a room.
Ps. the pictures are clearer if you enlarge them, by clicking on them :)

Lisa <3
Related Posts Plugin for WordPress, Blogger...