Showing posts with label DIYXMAS. Show all posts

Sunday, December 16, 2018

Blogmas Day 16: 5 DIY Projects for Winter and Christmas

Hello Friends,

I hope you are doing well and enjoying the season. I found some wonderful DIY crafts for Christmas that you can make in time for Christmas for your dinner table centerpiece or decor around your home to make it even more cozy and full of Christmas cheer.

1.  These pretty knitted trees pattern by Meg Ritcey are available for free pattern download on Ravelry until December 31st.
Photo source 

2. Branch Wall Decor. Words are for Writers shares this minimalist decor idea. I love the simplicity of this piece and how lovely it would look on the wall.

Materials needed: stick, yarn, fake or real festive greenery.

Photo source 

3. Winter scenes in mason jars.  These would decorate a shelf or table center piece.

Materials needed: mason jars, fake snow, small pine trees.

Photo source

4. Vase filled with twinkle lights and pine cones. These would be pretty on a side table or as a dinner table center piece at Christmas.

Materials: pine cones, battery operated small twinkle lights, hay for the bottom , vase


Photo source 

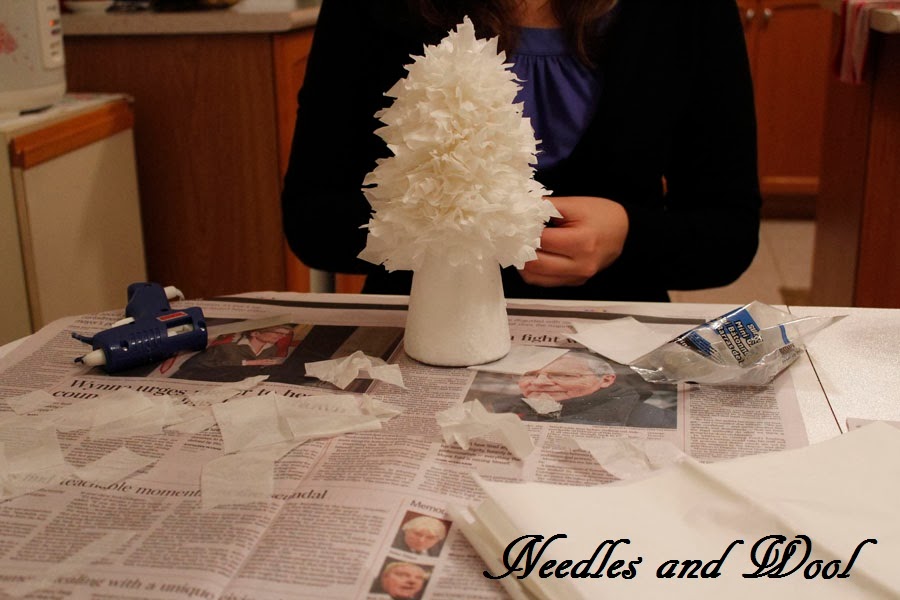
5.  Fleece Cone Christmas tree. Happy Happy Nester shares their tutorial on how to make these beautiful fleece cone trees.

Materials: Fleece pieces, wooden stand, cone
Photo source 

Thank you for stopping by my blog! I will be making the mason jar Christmas tree decor DIY this week and will share my tutorial. Please visit again tomorrow for another blogmas post.

Have a great day!


Friday, November 29, 2013

DIY: Paper Bag wrapping for Christmas

Hello friends! 


Photo source for picture attached:  hot cocoa

I was so inspired by Fox on the Run's Tumblr photo that I decided to make some of my own to share with my friends and family.  I also wanted to share the project with you.  I love this project because it allows you to tailor your gift wrapping specifically to the person you are giving the gift to.  In this DIY you will see that you can select a photo of your choice to put onto the paper bag with a wooden clothespin to make it look so festive.

So first we will start off as always with the materials you would need for this project.  

Materials:
-          Paper bags, with or without straps
-          Scissors
-          Photos (either printed from the computer or any other photos you choose to use)
-          Wooden Clothespins
-          Tissue paper

      Step one: 

      Find a photo you like on the computer.  I used Weheartit.com because I am always so inspired by the photos that users post.  I saw a bunch that I liked.  When doing it this way I recommend choosing a bunch and printing them out then make a decision because there are so many good photos on there you might get overwhelmed! (Like I did).  Then print out the photos you choose and cut them out.  I left a little white border around my photos so they looked framed.


 Photos are from weheartit.com: Links to these individual photos are:  Snowy cat, hot cocoa, candles, snowy street, cat with ornament.


 Collect your paper bag and clothespin


 Gift tags are optional, I bought these from a craft fair a couple years ago.  They look homemade and add to the charm of the brown paper bag.

Collect some tissue paper to wrap your gift 

Step two: 
Use your clothespins to secure the photo onto the paper bag.
 
 Add tissue paper and the gift inside and the gift tag on the other side so it doesn't block the photo.


 Then you have your Christmas gift wrapped in a unique way that will charm your friends and family.  Below are how the other photos I collected would look attached to the brown bag.

Source for photo: cat with ornament.    

Source for photo:  candles

Source for photo:  Snowy cat
 I also bought some Christmas tins from Value Village one day and wanted to share them with you.  I put some tissue paper inside to protect the gifts and I will tie a red ribbon around them and add gift tags before presenting them.

Thank you for visiting and I hope you come back soon! Happy Holidays! 


Thursday, November 21, 2013

Small Knitted Christmas Santa Hat Ornament

Hello again friends! 

COUNTDOWN TO CHRISTMAS: 34 DAYS!!
Today I was working on knitting some miniature Christmas Santa hats to hang on the Christmas tree.  I made up my own little pattern for the project.  It's very simple to follow and such a quick knit.
The pattern is posted below the photos.  Hope you enjoy making your own Santa hat ornaments!


MATERIALS:

red yarn
white yarn
6 mm circular needles
yarn threading needle


PATTERN:

Cast on 12 stitches using size 6 mm  needles
divide stitches equally (6 stitches) onto the two needles of the circular needles
knit for 5 rows using white wool
switch colors to red wool and knit for  9  rows
start decreasing by 2 stitches (1 decrease for each needle) each row for 4 rows after until you have 4 stitches left
switch to the white yarn again to make your pompom and knit for 4 rows then run the yarn through the stitches with your threading needle and tie a knot.
Use your threading needle to weave all strands into the inside of the hat.
tie a piece of yarn (any color) on the back of your hat to make the ornament to hang onto the tree.

I hope you enjoyed this pattern ! Have a nice night :)


DIY: Tree Branch Reindeer

Hello Friends!


We had a really windy night here in Toronto on Sunday night which blew down some branches in my front yard.  We have a birch tree that had some branches knocked down by the wind and I decided to make a birch tree Reindeer out of the branch.  I am getting pretty inspired by fallen twigs and branches this winter!
Below I've posted the materials and steps needed in order to make your very own Twig Reindeer.  It's so simple and I had a lot of fun seeing the reindeer come together.  It is truly amazing that you can make these things on your own instead of going to the store and spending a lot of money on Christmas decor and you also have the satisfaction of knowing you made it!


So first as always, you will need certain materials to make this DIY!

Materials:
- tree branch (for the body), and twigs (for the antlers)
- tree twigs
- hot glue gun
- festive ribbon
- scissors

Steps:  
1 and 2. Collect a tree branch from your tree outside a fallen branch is best instead of tearing one off.  I used a Birch tree branch for mine.
3. Break the branch into pieces to use for your reindeer.  I broke the branches using my hands but if your pieces are too thick you can cut them as well with scissors then try snapping them.  The size is up to you based on how large you would like your reindeer to be. You will need one large, thick piece to be the body, four shorter pieces to be the legs, another three even shorter pieces to use for the tail, neck and head.  Also you will need two pieces of twigs for the antlers.
      4. Glue the four smaller branches onto the body of the reindeer.  I glued the back legs on the end of either side of the branch of the body and the front legs under the branch of the body.
    5. Then glue on the neck and tie a bow with the ribbon around the neck part of the reindeer between the body branch and neck branch.  Glue a piece at the end to be the reindeer’s tail.                                    
    6. Then glue two twigs onto the head piece to become the antlers.
Then you are finished your reindeer, congratulations!


Thank you for visiting and hopefully you want to make your own reindeer using this DIY Tutorial.  For other tutorials on Needles and Wool, Please click the page at the top of the blog titled “DIY Tutorials” and for more Christmas Tutorials click “Christmas Tutorials” Thank you!

Sunday, November 17, 2013

DIY: Tissue Paper Christmas Trees


Hello friends,


 COUNTDOWN TO CHRISTMAS: 38 DAYS!

How is your day going?  thank you for visiting my blog!
Last night my friend Leeanna and I made these tissue paper Christmas trees out of Styrofoam cones and white tissue paper.  Leeanna found the DIY tutorial from AliLily's blog called Tissue paper tree tutorial.  It was easy to follow! It was such a simple craft and such an enjoyable activity to do while catching up and chatting at the same time. 


The materials for the DIY are:
-          -Styrofoam cones
-          -Tissue paper of any color you favor
-         - Scissors
-          -Hot glue gun and glue sticks
-          -Pencil or pen


First you cut out the tissue paper into squares and then dab a bit of glue onto the Styrofoam cone starting from the bottom, then you pull the square piece over the end of the pencil on the eraser side and twist the piece as you dab the pencil into the glue dab.  Continue to do this until you fill up the entire cone with tissue paper. 
These are some photos from when I was making mine (photos courtesy of Leeanna T):

The squares of tissue paper, we cut the squares 

Starting to glue the tissue pieces to the top of the cone

working my way down gluing the pieces onto the cone


Almost done... just a little more needed at the bottom

Then they are all finished !
I hope you give it a try! We had lots of fun making them !
Take care,

Saturday, November 9, 2013

DIY: Winter Tree Branch Display

Hello friends!

COUNTDOWN TO CHRISTMAS: 46 DAYS!


Hello everyone, I have worked on this DIY for the past couple days.  It is the simplest DIY I have ever done! One day I arrived home from work and saw a branch in my drive way that had fallen from a tree on our front lawn so I picked it up and thought I could do something creative with it.  Of course after looking on Pinterest I got inspired to make a winter tree branch display using the branch.  I made the paper ornaments using a tuturial on the blog How about Orange called "DIY paper teardrop ornaments".  Check out her blog if you are interested in making some yourself! they are light which make them perfect for the tree branches more delicate branches and they are easy to make and beautiful.
I loved making this craft and it turned out beautifully, I hope you give it a try and have fun!  


The Materials needed for this DIY are:

- tree branch
- acrylic white paint
- sponge brush or any type of brush you have
- vase
- optional pinecones for the vase or any other decorative materials.

Tree branch


Acrylic Paint


Sponge brush

Clear vase

 Step one: 

After taking the leaves off of the branch, you can begin painting the branch white.  The paint goes on smoothly.  I started from the tips of the branch then finished at the thickest part of the branch I found it easier this way.  Once the branch is fully painted you can let it air dry on a newspaper.

 Step two:

Place the dried tree branch in a vase and add some pinecones to the bottom of the vase.  I arranged the pinecones until I was happy with the way the branch was standing.  Sometimes the pinecones pushed the branch over so just keep adjusting until you are happy with how the branch stands.

Step Three:

Once you are done adjusting how you want your branch to sit, you can add some light ornaments.  I made my own paper ornaments using a tuturial from a blog: How about Orange called "DIY paper teardrop ornaments" if you want to also make these ornaments.

Then you are done! I hope you enjoyed looking at this DIY.  For more DIY Tuturials done by me, please click on the link above that says " DIY Tuturials".  Thank you!


Sunday, November 25, 2012

DIY: Christmas Paper Village

Hello friends,


 I am following through on my promise to make a paper village DIY.  I got inspired a week ago when I saw this display at Anthropologie.  I went to work on it last night and here are the steps to creating your very own winter display.  I found the instructions on how to make the trees from the Enchanted learning website and the inspiration and idea from the Anthropologie store.  It is Very easy to do! Have fun!
STEP ONE: 
Gather your materials. You will need:

- scissors
- tape
- white paper (2 sheets for each tree, and one sheet for each house)
- pencil
- cotton balls, glitter, or anything you want for the snow.

 
 STEP TWO: fold two pieces of white paper in half, one inside the other.  Then draw a tree pattern at the fold of the paper.

STEP THREE: cut out the tree!

STEP FOUR: then separate your two tree pieces.

STEP FIVE: cut a slit with your scissors from the top of the tree down to the center on ONE of the trees, and then cut a slit from the bottom of the tree to the center on the second tree. (they fit together this way like a puzzle)
 
STEP SIX: fit the trees together by sliding the tree that opens at the bottom onto the tree that opens at the top!  then tape the top pieces together and then tape the bottom pieces together. TA-DA!


STEP SEVEN: If you want a house for your village, here is a house decal of the house I made.  You can print it out if you need too :)


 And a church decal :) the cross is at the bottom to cut out and tape to the top.  I ran out of room on the paper :)

 
 STEP EIGHT: Cut out the houses and put everything together to create your very own village! I added cotton balls for a snowy effect :)

a cozy village

A snowy tree

A christmas church

A home to keep you warm
 Hope you enjoyed the DIY, if you have any questions feel free to email me at lknitter09@gmail.com.  I'd be happy to answer questions, and get your feedback :)

Have a lovely evening and keep warm! :)


Related Posts Plugin for WordPress, Blogger...